

While fall DIY projects are fun every year, this year it seems especially enticing to find something creative to do. With that in mind, here are a few simple, budget-friendly projects that require little effort and make perfect fall decorations for any college apartment or dorm room.
Candy corn Jack-o-lanterns:
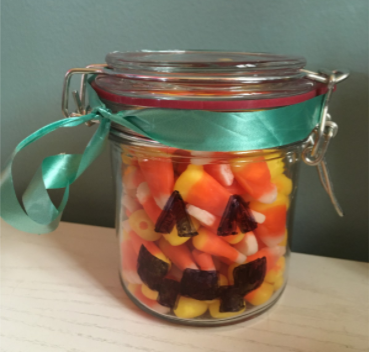 This incredibly simple project requires very little time and makes a cute Halloween decoration for your desk or countertop. With just a little bit of candy corn and a mason jar, you can create a friendly Halloween buddy to put alongside your carved pumpkins or other spooky decor.
What you will need: candy corn, a jar, a permanent marker, ribbon (optional) and scissors (optional)
- Fill a jar with candy corn. Make sure that you have poured enough candy corn for the jar to appear full, but not so much as to keep the lid from closing properly.
- Wrap the ribbon around the top of the jar. The length and color is your personal preference, but be sure that the ribbon is long enough to curl, but not too long to maneuver.
- Carefully wrap the ribbon around the blade of a pair of scissors. Slowly pull the blade toward you allowing the ribbon to slip between your finger and the blade. This will curl the ribbon.
- Draw a face on your pumpkin using a permanent marker. Silly, scary or downright cooky — it’s up to you!

Leaf Garland:
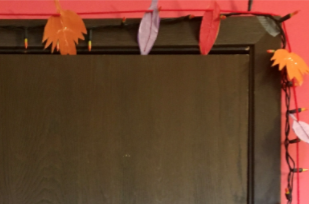
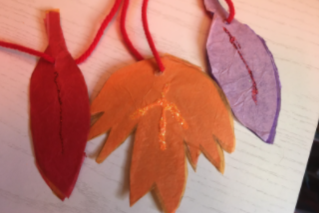 This garland is easy to make and pretty to hang. Although this project takes a bit more time, it’s a decoration that can be left up through Thanksgiving and is a great accent piece for windows or doors.
What you will need: Multi-colored construction paper, (you can use fall colors of your choice) tissue paper, (fall colors of your choice) glitter, glitter glue, scissors, yarn, a pencil, nutpick (optional) and hole punch (optional)
- Draw the shape of a leaf out on construction paper. You can draw by hand, as shown here, or buy a cheap stencil.
- Cut out the leaf from the paper and trace its shape onto construction paper of the same color.
- Repeat step 2 for as many leaves as you desire (I did five of each color). Cut out the leaf shapes that you have traced.
- Draw the shape of a leaf out on construction paper (a different color from the first). You can use the same shape or choose a different shape.
- Cut out the leaf from the paper and trace its shape onto construction paper of the same color.
- Repeat step 4 for as many leaves as you desire and cut out the leaf shapes that you have traced.
- Complete the drawing, tracing and cutting of leaves for as many colors as you would like on different colors of construction paper (I chose three colors for fifteen total leaves).
- Once you have cut out each of your leaves, trace their shape on tissue paper of the same or a similar color.
- Cut out each of the leaves that you have traced on the tissue paper.
- Once you have cut out your leaves, crinkle them up to create texture.
- Paste the tissue paper leaves onto the corresponding construction paper leaves.
- Repeat steps 8-11 for as many layers of tissue paper as you want (I did two layers of tissue paper on one side and one layer of tissue paper on the other).
- Use glitter glue or glitter to create veins in each of your leaves. You can use the same color as the body of the leaf, as I did, or you can choose a different color.
- Once the glue has dried, create a hole in the top of your leaf (where the stem is). I used a nutpick to create a hole that was large enough to string yarn through, but small enough to prevent the leaves from sliding. You could also use a hole punch or a pencil to puncture the paper.
- Cut a piece of yarn of desired length. String the yarn through the holes in the leaves and tie knots in each end of the yarn to keep the leaves from slipping off the ends.
Pumpkin-on-a-Hanger
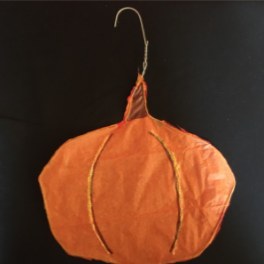 This project requires a little bit of hand strength, but the end result is a cute, inexpensive and easily-hangable decoration for your window or door. With just a few materials, most of which you likely have “hanging” around your house or dorm, this project will make a fall statement to last the entire season.
What you will need: A hanger, tissue paper, markers, scissors, liquid glue, glitter (optional)
- Choose a metal hanger with a thin, easily bendable wire.
- Start by straightening the tighter curves of the hanger (near the top and at the ends) so the whole wire is easier to twist.
- Twist the hanger into the shape of a pumpkin.
- Place the hanger on a piece of newspaper or scrap paper so you do not get glue on your surface. Create a thin layer of glue around the circumference of the hanger.
- Place a sheet of tissue paper over the glue on the hanger. Allow it to dry.
- When the glue has dried, cut the excess tissue paper from around the hanger. I used scissors, but you could also use an Exact-O knife.
- Flip over the hanger. Spread glue over the wire and place a sheet of tissue paper over the glued wire.
- Allow the glue to dry, then cut away the excess tissue paper.
- Repeat steps 7-8 as many times as desired. If you want to hang your pumpkin on the window and allow the sun to shine through, use only a few sheets. If you would prefer a more opaque pumpkin, use more sheets.
- Once you have finished gluing sheets of tissue paper to your pumpkin, use a marker to draw lines on the pumpkin to create dimensions and color in the stem.
- Trace a thin line of glue around the lines that you drew on your pumpkin. Sprinkle glitter on these lines and allow to dry.